Sunday, June 29, 2008

Wild Alaskan Salmon

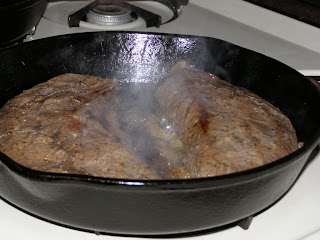
I usually cook salmon on the grill but this time I thought I’d try it in a cast iron skillet. Nothing too difficult, just a nice coating of lemon pepper and then a drizzle of sesame oil to finish it off.

This salmon is looking good. I’m really looking forward to this.


Disaster strikes! The skin has stuck to the pan! What a bummer. How am I going to deal with this? That’s another post. Well I can’t be too upset as the salmon tasted great. I guess I’ll stick to baking or grilling salmon until I figure out what went wrong.


Wednesday, June 25, 2008

Fajitas

Fajitas are a great way to jazz up a mid week dinner. With a little advance preparation they can be done and on the plate in no time. The bare minimum advance prep is to marinate your meat overnight. If you want to take it a step further and really save some when you start to cook, prep the vegetables in advance too. Start with a flank steak, skirt steak or flat iron steak and prepare the marinade. I used flat iron steak for this recipe. Place the meat in a gallon size freezer bag then add the following marinade ingredients, shake to coat and marinate overnight.
• ½ cup canola oil
• Juice of 3-4 limes
• 2 tsp ground cumin
• 1 tbsp minced cilantro
• 2 tsp dried oregano
• 2 cloves garlic minced
• Kosher salt and ground black pepper to taste
• Splash balsamic vinegar
When you are ready to start cooking, remove the meat from the marinade and pat dry with paper towels, then place in the freezer for 10 minutes before you are ready to start slicing it. This will make the meat easier to cut into thin slices. For the vegetables, slice two onions and julienne one each green, red and yellow pepper. Sauté the vegetables a skillet for about fifteen minutes until they look like this.


While the vegetables are cooking slice the steak against the grain in finger length thin slices. Put the cooked vegetables in a casserole dish, cover and place in a 140F oven to keep warm.
Cook the thin sliced steak on medium high heat for about two minutes per side. It doesn’t take long for the thin sliced meat to cook. Cook the meat in batches so as not to crowd the pan. If you dump all of the sliced meat in the skillet it will stew and come out tough. It will probably take three or four batches to cook the meat. Put the cooked batches of steak in the casserole dish with the vegetables to keep warm.


Once the fajitas are done it’s time to heat the tortillas. Try to find fajita style tortillas as they are a bit smaller, thicker and handle the fajita juices better. Remove the fajitas from the oven and turn the oven up to 350F. Wrap the tortillas in foil and warm in the oven for ten minutes.
While the fajita style tortillas are warming prepare your condiments. Since this was a mid week family style, time saving recipe, I opted for store bought guacamole, salsa and sour cream. Shredded Monterey Jack cheese would be nice also. I served these with tortillas and salsa but I have a good recipe for black bean salad that would be great with this but that’s another post.


If you want to get fancy for guests or treat your family to an extra special presentation there are nice cast iron fajita skillets available for individual service. Place the fajitas on the skillets and place in a hot oven until they sizzle. When you bring them to the table, enjoy the ooh’s and ahh’s. If you use this method you will want to slightly undercook the meat as it will finish cooking in the sizzling skillet.

Saturday, June 21, 2008

Cast Iron Skillet Cornbread

Cast Iron Skillet Cornbread is to some the holy grail of cast iron skillet cooking. Perfect golden brown cornbread perfection is so hard to achieve if you don’t know a few secrets to success. Then there’s the whole white cornmeal or yellow cornmeal, North vs. South issue to deal with. The North vs. South issue continues with sugar or no sugar, flour or no flour or some flour. I tried a Texas recipe with just yellow cornmeal and no flour and it came out like a flat dense Johnnycake. I’m sure some people love it that way but it wasn’t to my taste. Well I’m not here to fuel fire to those debates as I just want to share some secrets that will make your cast iron skillet cornbread cooking experience memorable one. Memorable as in perfect golden brown moist cornbread perfection, not memorable as in “My freakin’ cornbread burned and stuck to the skillet and I hate this heavy cast iron piece of bleep!”. I have also seen a lot of recipes calling for butter in the skillet. I haven’t had much success with just butter as the butter solids tend to burn at these high temperatures. Most recipes I’ve read had said to invert the cornbread onto a plate yet it is rare to see a picture of one this way, so I’m going to show you my bottom. Err, I mean I’m going to show you my cornbread inverted.


bacon, jalapeno and onion cornbread

Here are the tips to success. Obviously you will want to use a well seasoned skillet. Use three bowls for preparation. One for wet ingredients, one for dry ingredients and one working bowl for measuring the dry ingredients. Your measuring cups for dry ingredients should be flat on top. Measuring cups with curved tops and spouts are for liquids. When measuring use the scoop and level method. Scoop the dry measure cup into the cornmeal / flour then hold over the working bowl and level the top with a straight edge. Next sift the flour, baking powder, baking soda and salt into the cornmeal and mix thoroughly. Lightly mix the egg into the buttermilk. Don’t whisk it to frothy foam as there is no need to incorporate that much air into the egg white. Now here’s an important part. Pour the dry ingredients into the buttermilk egg mixture and stir slowly with a large spoon until just combined. Don’t overwork the cornbread! Now add any other flavor ingredients you want and stir gently until incorporated. While all this is going on you should have been pre-heating your oven to 425F unless you have one of those three minute super ovens. Place the skillet with about four tablespoons of oil into the pre-heated oven for about 10 minutes.You can also use clarified butter or three tablespoons oil and a tablespoon of butter. When you remove the hot skillet from the oven pour two tablespoons of the hot oil into the cornbread batter. It will sizzle when it hits the top of the batter, then stir to incorporate the oil. Cook for twenty minutes then remove and let stand for ten minutes. During this standing time, take a knife and run it around the edge of the skillet to loosen the cornbread to make inverting it onto the plate easier.


Skillet Cornbread Recipe Ingredients
• 1 1/4 cups stone-ground yellow cornmeal
• 1 cup of all purpose flour
• 2 teaspoons baking powder
• 1 teaspoon baking soda
• ½ teaspoon salt
• 1 ½ cups buttermilk
• 1 large egg
• Additional flavor ingredients. I used bacon, jalapeño and onion.

Here's one where I used oil and butter. Notice the browned butter solids around the edge. The top looked better on this one. This is the method I usually use.


Time to eat!


Wednesday, June 18, 2008

Big Skillet Burger

This one sort of goes into the category of yeah you can do it but why? I mean it tasted really good but I wouldn't eat it as a burger on a bun. If you cut that bad boy into quarters you will need some triangle shaped buns! It's more suited as a meatloaf style dinner. The next time I'll probably add some bread crumbs.


You will need about a pound of ground chuck, about a quarter of an onion minced, one egg, a few slices of cheddar cheese, four slices of cooked bacon and salt and pepper to taste. Mix the ground chuck, onion and egg together with your hands. Divide the mixture into halves and form into patty shapes. Top one of the patties with cheddar cheese and bacon. Place the other patty on top and form until the edges are sealed and you feel guilty. Season the top with freshly ground black pepper. Cook in a cast iron skillet over medium high heat for about 4 minutes then pop into a pre-heated 350F oven for about ten minutes.


Sunday, June 15, 2008

Roasted Cauliflower

After reading Eraine’s blog on roasted cauliflower, I knew I had to have some. I had it before but somehow had completely forgotten about it. How I could forget about something so caramelized, crispy soft and flavorful is just weird. Steamed cauliflower is just so-so and cauliflower with cheese sauce is getting old so this is a great way to liven it up!
I used one whole cauliflower cut up into pieces and coated with olive oil, salt, pepper, oregano and nutmeg. Place the skillet in a pre-heated 450F oven for 30 minutes. Shake the pan about every 10 minutes to evenly cook.


Speaking of pre-heated ovens, it amazes me when someone turns on the oven a few minutes before placing the dish in it then wondering why it didn’t turn out as they had expected. Hello, there is a reason the recipe called for a pre-heated oven. Maybe they think they have some kind of super oven that can pre-heat to 400F in three minutes. But I digress.
After I removed it from the oven I sprinkled on some Parmigiano-Reggiano. Thanks for the great recipe Eraine.


Wednesday, June 11, 2008

Roasted Fingerling Potatoes

Roasted Fingerling Potatoes. Nothing earth shattering here, just simple goodness. Coat potatoes with extra virgin olive oil, season with kosher salt and fresh ground black pepper then add some minced garlic and rosemary. Toss to coat then put them in your trusty cast iron skillet. Put the skillet in a pre-heated 450F oven for about 25-30 minutes. I like to open the oven and shake the pan back and forth a few times during the cooking to get some crispiness on more than one side of the potato.


Saturday, June 7, 2008

Caramelized Onions

Caramelized onions add a savory sweetness to many dishes from Lyonnaise potatoes, French onion soup and steaks to a sandwich topping They are easy to make once you know how. Many beginners tend to cook the onions over to high a heat, burning them rather than caramelizing. I use olive oil and a tablespoon of butter but you can use just oil or clarified butter. I would stay away from just butter though as the solids in the butter will burn. Cooking time will vary depending on the amount of onions used. It may takes as little as ten minutes to as long as 30 minutes or more. Start cooking on medium heat then turn the heat down to medium low after about 10 minutes to prevent burning. You will find that many times you will need to reduce the heat while cooking with cast iron due to its excellent heat retention. Add 1 tsp sugar at the beginning and another about halfway through the cooking time. The sugar is optional as the natural sugars in the onions will caramelize but it speeds up the process a bit and adds a nice touch. Many recipes call for an onion per person. At first thought you might think, “Gawd, that way too much onion!”, but after you see how much they reduce you will understand.
Here are four jumbo Vidalia onions sliced and ready for the skillet.


I used about three tablespoons of olive oil and a tablespoon of butter heated before I add the onions. Now stir to coat the onions with the oil. Continue stirring occasionally, scraping the onions from the bottom of the skillet.


Here’s what they look like at about twenty minutes. At this point I might use them for fajitas or yellow squash and potatoes.


Here we are at about 30 minutes with nicely caramelized onions. I tend to make more than the recipe calls for as I can refrigerate them for a few days or freeze them for up to a month.


Wednesday, June 4, 2008

Flat Iron Steak

Flat Iron Steak is an undervalued cut created by research done by the University of Florida and the University of Nebraska on behalf of the National Cattlemen’s Beef Association. This research found this to be the second tenderest cut of beef after the tenderloin. Where in the heck has this jewel been hiding for all these years? It was nestled in the shoulder clod with a thick piece of tough connective tissue which lead to the assumption that it was a touch cut. Researchers developed a procedure to cut the steaks removing the connective tissue, yielding four tender inexpensive and flavorful steaks per cow. I bought these on sale for 3.99 per lb and each was just a little over a pound.


I whipped up a marinade with olive oil, fresh lemon juice, kosher salt, fresh ground black pepper, oregano and a splash of red wine and let them marinate overnight. Using the trusty 12” iron skillet I seared them on each side for about 2 ½ minutes then placed the skillet in a 400F oven for 15 minutes to finish. I topped each with sautéed caramelized onion, mushrooms and A1 sauce. Wow, what a great tender steak for two bucks!