Saturday, August 22, 2009

Bacon Cheese and Mushroom Polenta

Polenta has come full circle from it's origins in early Roman times as gruel or porridge to a premium dish in fine restaurants. This comforting peasant food can take on many forms from a creamy grits style to grilled on a Weber, deep fried or baked in the oven. Here's one of my takes on this classic comfort food.
This polenta is of the formed, baked variety. The original recipe that I have used for years called for 4 cups of water to one cup of cornmeal, Fontina cheese and oyster mushrooms. I have since come to prefer a creamier more savory version and have modified the base recipe in this version. One of the great things about this recipe is that you can easily substitute what you have on hand or prefer and still follow the basic recipe.


To cook the polenta bring 5 cups of chicken broth to a boil in a high quality 3 quart sauce pot with thick solid base. You will need the thick base for even slow cooking. Once the chicken broth comes to a boil, slowly pour in a fine stream of a cup of yellow cornmeal whisking with a wire whisk. Continue whisking until the mixture returns to a boil then reduce heat to low or very low if cooking with gas. Cook for about 20 minutes, whisking until the cornmeal slowly falls off of the back of a wooden spoon adding water as necessary to maintain desired consistency. I alternate between a whisk and a wooden spoon while stirring. I use the spoon to scrape around the bottom curve of the pot to prevent sticking. When the polenta is done, remove from heat and whisk in 4 tbs soft butter.
Wait a minute! I said slow cooking and now I'm talking about 20 minutes! Well if you cook it over medium heat you will end up with a clump of yellow goo so I guess it's all relative. I really cook this to feel adding water if needed over a low heat and may cook it for 30 minutes. You can cook this for an hour or more if you like;)
Next pour the polenta in to a greased 9x13 casserole dish and place in the refrigerator to cool completely for about 2 hours or so.


While the polenta is cooling, saute a pound of your mushrooms of choice. I used baby Portablellas and cooked about a 3/4 lb of bacon until crispy. Coarse chop the bacon and set aside. To assemble, invert the polenta onto a cutting board and cut in half. Top one half of the polenta with mozzarella cheese, mushrooms and chopped bacon. Place the other half of the polenta on top and top with mushrooms, bacon, Fontina cheese and grated Parmesan cheese.
Place the assembled polenta in a preheated 350F oven for about 30 minutes until the cheese is melted and polenta is hot.


What you will need
1 cup of yellow cornmeal
5 cups of chicken broth
3/4 to 1 lb cooked bacon
1 lb mushroom
4 oz sliced Italian Fontina Cheese
4 oz sliced or grated mozzarella cheese
freshly grated parmesan cheese for topping

Tuesday, August 18, 2009

Goat Cheese Stuffed Burger

Goat cheese stuffed burgers topped with roasted red peppers is a nice way to mix it up from your standard cheeseburger fare. Start with about 3oz of your ground meat of choice and form into a patty with a well in the middle to hold the goat cheese. Spoon about a teaspoon of garlic and sun dried tomato mixture into the well. I found this at a local Publix but a homemade mixture would do nicely. Next slice a piece of log roll fresh goat cheese about 1/2 inch thick on top of the sun dried tomato garlic. Now form a large golf ball sized ball of your ground meat and form it into a patty to place on top. Form the patty until it is well formed and nothing will ooze outside while cooking. Cook for about four minutes per side on a grill or iron skillet until medium.
Prepare your roasted red peppers, either fresh of jarred to your preference. I used jarred red peppers lightly marinated in Zesty Italian Dressing. I like serving these with stone ground dijon mustard.


Sunday, July 12, 2009

Golden Potato Squash Torte

I love potatoes, squash and onions so when I came across this recipe I just had to try it. Well after visiting two stores and no green onions, I decided to substitute yellow onion. Who knew there was a green onion shortage? The original recipe called for cooking this in two 8" cake pans. What's up with that?


Oil your cast iron skillet then layer the potatoes in concentric circles overlapping slightly. Layer the squash the same way then sprinkle on about a third of the cheese mixture and press down to flatten. Drizzle with a little olive oil. Add another layer of potatoes squash and cheese mixture, finishing with a layer of potatoes and cheese, lightly pressing to flatten each time and drizzling with olive oil. Cover with foil and bake for 40 minutes in a 375F oven. Remove the foil and bake for another 25 minutes.
For the cheese mixture combine Parmesan cheese, flour, thyme, green onions, salt and pepper. Reserve a handful of the green onions for garnish.


What you will need:
A large Iron skillet
5 Yukon Gold potatoes sliced thinly
2-3 Yellow squash
1 bunch green onions, thinly sliced
1 cup grated Parmesan cheese
2 tablespoons all purpose flour
1 tablespoon chopped fresh thyme
1 1/2 teaspoons salt
3/4 teaspoon ground white pepper
Olive oil

Sunday, July 5, 2009

Fouth Of July 2009

It's the Fourth of July and I'm heading down I75 to Kevin's for pool time, music and Big Green Egg fun! Last year it was beef tenderloin, this time it's pork spareribs smoked on the BGE. Oh and I got to meet up with a long lost friend. It doesn't get any better than that ;)
Three and half hours or so at 250F with lump charcoal and some soaked hickory chips is a beautiful thing.


Pool Dogs


Tuesday, June 23, 2009

Pitas Inside and Out

A quick trip to the grocery story with no real plan in mind for dinner and I find myself aimlessly wandering the aisles. Man I was supposed to have a plan here. What happened? I set out the early morning hours with a cup of coffee in hand reading some of my favorite food blogs thinking "I really need come up with an idea for dinner. These recipes look great" and yet here I am desperately trying to formulate a plan on the fly when I spot the pita bread. Hmm, maybe something light like a vegetable stuffed pita. Oh and those Brussels sprouts I passed earlier looked good for a side...
Wait that rotisserie chicken might be good in the pitas. So much for the vegetarian idea.
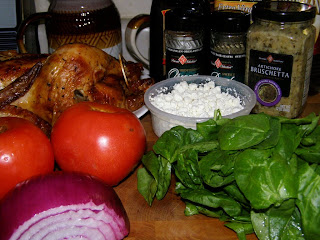
What I decided on was pitas with rotisserie chicken, fresh tomatoes lightly marinated in Italian dressing, red onions with a light olive oil and balsamic marinade, goat cheese and fresh spinach and an artichoke bruschetta.
By the time I got started making these pitas I had decided to not only stuff them but to make pita pizzas out of them. Sometimes not having a plan works out okay.


Wednesday, June 17, 2009

Tomato Pie

No it's not a pizza pie. It's a southern thing. A trip to the farmers market yields a bunch of large beautiful ripe tomatoes and with that comes a need for recipes. I can eat a thick slice of tomato with mayo on wheat bread and make fresh tomato sauce but I'm always looking for ways to use fresh tomatoes in the spring and summer. I used this recipe as a starting point but made some minor changes to suit my tastes. First off, the method I use to peel the tomatoes is slightly different. I do cross slice the tomatoes on the bottom as she does but I dip mine one at a time for 10 seconds in low boiling water for 10 seconds then into a colander and spray with cool water.
Second, I don't think she seeded them enough. After I peel the tomatoes, I slice them in half then squeeze them to work out the seeds, After that I do the coarse chop and place them in a colander with a liberal sprinkling of salt and let them drain for at least 30 minutes, shaking occasionally. Too much moisture and seeds are the enemy of a good tomato pie!
I don't have a secret ingredient (yet). I just use dried basil, garlic powder, a sprinkle of sugar to counteract the acidity and cracked pepper. There is no need for more salt during the pie assembly as the salt used during the draining process is more than adequate.
The only other thing that I did differently was to use half mozzarella and half cheddar. Also 1/2 cup mayo per 2 cups of cheese is really quite enough Paula Dean.
I really recommend using the coarse chop on the tomatoes rather than tomato slices because it is easier to eat as you won't pull a whole slice of tomato out when you take a fork full!


Thursday, June 4, 2009

Shrimp and Grits

Shrimp and Grits are a Charleston South Carolina classic. Traditionally a breakfast dish due to the plentiful fresh shrimp and Shrimpers in the area, it was later refined and served in fine restaurants. Here's my take on this southern classic.
First use stone ground yellow grits, no white grits or quick grits allowed. Second use stone ground yellow grits.


If you want to start out easy and get the feel for cooking the grits, just try some plain shrimp and grits or maybe some cheese grits. Once you have that down then you can start sauteing some peppers and onions and adding a sauce.


If you want to try the shrimp and grits pictured above there are five steps involved. Cook the grits, make the sauce, saute the vegetables, add the shrimp and sauce to the vegetables and simmer to cook the shrimp and meld the flavors then spoon the shrimp and sauce mixture over the grits and serve. Oh I almost forgot the sixth step! Eat and enjoy.


To cook the grits bring 4 cups of chicken stock to a boil and slowly stream in one cup of grits whisking with a wire whisk. Return to a boil then reduce heat to low and cook for 8-10 minutes stirring occasionally. Now stir in 1 to 1 1/2 cups shredded cheddar cheese and 1/2 cup heavy cream and cook for another 8-10 minutes over low. I also add 1/4 cup fresh grated Parmesan but that's optional. Thin with more chicken stock as needed to keep the grits creamy smooth.
For the sauce add 1 tsp oil, 1 Tbs minced shallot and minced garlic and saute for a couple of minutes then add 1 cup white wine and the juice of 1 lemon and simmer until reduced by two-thirds. Whisk and add 1 cup heavy cream and reduce by one half. Add 4 oz soft butter a whisk until butter is melted. Keep warm.
For the vegetables add 1 tbs oil to your hot iron skillet then add the red onion, red pepper and green pepper and cook over medium to medium low heat for 5-6 minutes until the peppers have softened a bit.
To finish the shrimp aspect, add the shrimp, sauce and chopped cooked bacon to the pepper and onion mixture and simmer for 5-7 minutes until the shrimp are done. Salt and pepper to taste.
Assembly. Plate the creamy smooth cheese grits and spoon over the shrimp mixture. Enjoy!


Shrimp and Cheese Grits drizzled with a wine and balsamic sauce.


Shrimp sauteed in an iron skillet for the above simple Shrimp and Grits


What you will need.
For the grits
1 cup stone ground yellow grits
4 cups of chicken stock
1/2 cup heavy cream
1 cup shredded mild cheddar cheese
1/4 cup fresh grated Parmesan cheese
For the Sauce
1 tsp oil
1 Tbs minced shallot
1 clove garlic minced
1 cup dry white wine
1 cup heavy cream
The juice of 1 lemon
Pinch of salt
The rest of the story
About 1 pound of shrimp peeled and deveined
1/4 cup red onion diced
1/4 cup red pepper diced
1/4 cup green onion diced
3-4 slices of thick cut cooked bacon chopped
Salt and pepper to taste

Tuesday, May 26, 2009

Carnitas Tacos

Carnitas are a wonderful thing. Slowly braised Boston Butt tender and succulent on the inside with a nice caramelized crunch on the outside. The principle is simple, cut up a Boston Butt into about 2 inch strips and add just enough water to cover the meat and then slowly simmer until the water is gone. Once the water has simmered away you will be left with the pork and the rendered collagen cooking away to form the caramelized crunchy exterior. The whole process will probably take 2 1/2 to 3 hours. Mine didn't quite turn out as well as I had hoped as I started stirring the meat too much once the water had evaporated and shredded quite a bit of the meat. I used a large cast iron wok but a dutch oven would work very well. The next time I'll be a little more gentle turning the meat once the water has evaporated. Oh and you should never touch the meat during the braising process. Anyway if you want to see it done the right way check out The Homesick Texans version.
I decided to make tacos with Salsa Verde, onions and cilantro on flour tortillas. I served these with baked pablano peppers filled with refried black beans, queso Chihuahua and Mexican sour cream.


Wednesday, May 13, 2009

Hot Dogs Chicago and WV Style

I never “got” Chicago style hot dogs looking at pictures of them or seeing them on television. I was like “That’s no hot dog, there’s way too much stuff on them!” Some of them were topped with huge amounts of toppings that would presumably take a knife and fork to eat. It just didn’t make sense to me until one day I went to a Chicago style dog place and had one and it clicked. These are great man!. I can’t believe I never had one of these before. Notice I said Chicago style dog as I have never been to Chicago. I do feel there is a reasonable amount of topping to put on one though even if I were in Chicago. I’m sure I’ll be lambasted for that as well as not using poppy seed rolls.


The pickle wedge is in there trust me


I cook my dogs in a cast iron skillet over medium heat with about 1/2 cup of water or more. After the water simmers away the dogs will be left to cook in the rendered fat.


Traditional Chicago style hot dog toppings. Tomato, relish preferably neon green), minced onion, Sport peppers, yellow mustard, Kosher dill pickle, celery seed and optional cucumber on a poppy seed roll.


My all time favorite though is the West Virginia Slaw dog with chili sauce, minced onion, yellow mustard and sweet slaw on a steamed roll. Again I’ll probably be lambasted for using wheat rolls here but I liked them.


Saturday, April 11, 2009

Taquitos #14

I'll have the #14. Nothing authentic here, just the feel of ordering a number from the menu of your local neighborhood American Mexican restaurant. Tasty, comforting and familiar, it's how Americans eat Mexican food but nothing like real Mexican food. I'm going to have to try some of those Mexican street foods I've seen on Anthony Bourdain's No Reservations but for now please enjoy your number 14.


What you will need for the Taquitos.
2 Lbs chicken breast cut up
1 red onion diced
1 red pepper diced
2-3 jalapeños diced
3 cloves of garlic minced
1 Tbs Mexican oregano
1 tsp ground cumin
Salt and Pepper to taste
Oil for frying
24 Corn tortillas

Heat your cast iron skillet over medium heat, add about 2 Tbs oil, chicken, onion, red pepper, garlic and jalapeños and cook until chicken is done and vegetables are soft about 8-10 minutes. Stir in the oregano and cumin. Add the chicken mixture to the food processor and pulse until coarsely chopped, set aside.
Prepare the tortillas for the filling. There are two ways to do this, restaurant style and nuke. To prepare restaurant style heat about ¼ cup oil in your skillet and place a corn tortilla in for about 3 seconds then turn over for another 2 seconds, remove and place on paper towels to drain. The corn tortillas really only need 5 seconds. To microwave place tortillas on a plate and cover with a damp cloth or paper towel and microwave for about a minute depending on your microwave. Please be careful here as you don't want to start a fire in your microwave.
Place about a tablespoon or so of the chicken mixture in a tortilla and roll tightly securing with a few toothpicks. I always make these too big. I just can't seem to make the small and tight. Oh well. Keep the tortillas covered while working to keep them pliable. Fry the Taquitos for a few minutes, turning after a couple of minutes until nicely browned.

Sunday, March 15, 2009

Tuna Salad

I was eating a lame tuna sub at a well known sub shop the other day when I decided to make my tuna salad so the memory of this tuna sub wouldn't linger too long.


Tuna salad on toasted French bread slices.

What you will need.
Two 12oz cans solid white Albacore or fresh tuna
One 14oz can quartered artichoke hearts
1/2 red bell bell pepper minced
1/2 red onion minced
2 Tbs capers
1/4 cup chopped Italian parsley
1/4 cup chopped basil
2 cloves garlic minced
3 Tbs fresh lemon juice
Lemon pepper to taste
Freshly grated Parmesan cheese
2/3 cup mayonnaise
Or
Extra virgin olive oil

This salad works well with mayonnaise or extra virgin olive oil.

Monday, March 2, 2009

Baked Ziti

There are a lot of variations on this great Italian comfort food and here's one I made recently. It's easy to make, inexpensive, delicious and reheats well. Pair this ziti up with some garlic bread and a salad and you've got a meal that's sure to please. Try different variations with ricotta, pancetta, prosciutto, meatballs and vegetarian to keep it new and interesting.
I used crumbled sweet Italian sausage but you could just as easily used sliced sausage.
Oh and check out how this Italian lady makes her Baked Ziti.


What you will need.
1 Lb sweet Italian sausage
1 onion chopped
1 green pepper diced
2 cloves garlic minced
1/2 to 1 tsp crushed red pepper
1 Lb ziti
about 5 cups of your favorite pasta sauce
16 oz mozzarella cut into 1/2 inch cubes
1/2 cup fresh grated Parmesan cheese

Cook the sausage, onion, green bell pepper, crushed red pepper and garlic until the sausage is done. Drain the fat and set aside.
Cook the ziti according to package directions, drain and place back in the cooking pot Don't rinse your pasta or PrincessDiana161 will be really upset. Add the Italian sausage mixture, pasta sauce, mozzarella cheese and half of the Parmesan and stir to combine. Spread a little of the pasta sauce in the bottom of a 9 x 13 casserole the pour in the ziti mixture. Sprinkle the remaining Parmesan cheese on top, cover with aluminum foil and bake for 20 minutes in a 350F oven. Remove foil and bake uncovered for another 30 minutes. Let stand for 10 minutes before serving.

Saturday, February 14, 2009

Jambalaya

Is it Cajun style or Creole style? Well it's sort of a cross between the two. I didn't use tomatoes as you would in Creole style but I did add equal parts water and rice in the creole style. Cajun style jambalaya usually calls for twice as much water as rice. Nothing fancy here just simple goodness. The holy trinity married with the andouille sausage, shrimp and spices is really all you need for a great tasting jambalaya.


Cook the sausage over medium heat for 8-10 minutes then set aside. Add a tablespoon of oil to the pot and cook the vegetable until soft, about 10 minutes. Add the andouille sausage back to the pot, add the shrimp, stir in the spices and cook over medium low heat for another 10 minutes. Add the rice and water and bring to a boil. After a boil is reached reduce heat to low, cover and simmer for 20-30 minutes until the water is absorbed and the rice is done.


What you will need.
1 Lb Andouille sausage
1 Lb Shrimp peeled and deveined
1 large onion chopped
1 green pepper chopped
1 red pepper chopped
3-4 ribs of celery chopped
2 tsp cayenne pepper
2 tsp black ground pepper
1 tsp white pepper
1 tsp oregano
1 tsp thyme
3 1/2 cups rice
3 1/2 cups water

Sunday, February 1, 2009

Carolina Style Pulled Pork BBQ Sandwiches

Pulled pork in a 5qt dutch oven is easy and straightforward with a couple of minor exceptions. The first is to cook the pork until it reaches an internal temperature of 185F. At first thought you might think “Whoa that's 25 degrees higher than the USDA recommendation. Won't it be tough?” That might seem valid considering I usually cook pork at 150-155 but the higher temp allows the fat in the Boston Butt to render and tenderize the meat. The second thing is the resting time. Most would let it rest for about 15 minutes or so but I learned a technique from an avid BBQ guy about resting and when I say BBQ I mean slow cooking on a smoker. Wrap the Boston Butt in heavy aluminum foil and place it in a small insulated cooler with towels above and below the meat and let it rest for an hour or so.This step will continue the rendering and tenderizing process. Don't worry it will be steamy and warm when you pull it out of the cooler.
The Carolina style comes from the vinegar and mustard based BBQ sauce.


What you will need for six hungry people.
1 onion sliced
6 cloves of garlic slightly mashed with the back of a knife
1 – 18oz bottle of Carolina style BBQ sauce
1/3 cup brown sugar
1/3 cup cider vinegar
28 oz beef broth
½ tsp pepper
3 ½ lb Boston Butt
2 Tbs cornstarch and 3 Tbs water blended

Combine first seven ingredients in the dutch oven and stir well. Add the Boston Butt, cover and place in a preheated 275F oven. Cook for 3 hours, turning once halfway through. Remove the meat and let it rest for an hour in the cooler (see above). For the sauce, strain about 2 ½ to 3 cups of the cooking liquid into a saucepan, add the cornstarch water mixture and bring to a low boil for 4 to 5 minutes. After the meat has rested pull the pork into long shreds using two forks. Ladle the sauce over the pulled pork or pass separately.


For the slaw combine 1/4 cup cider vinegar, 2 Tbs sugar, 1/4 tsp celery seed and whisk until blended. Add 1/2 cup light mayo, 1/4 tsp kosher salt, 1/4 tsp ground pepper and whisk until smooth. Add a 16oz bag of Fresh Express 3 Color Deli Style Cole Slaw and stir to coat evenly.


Forget serving the slaw on the side. This is the way to eat BBQ!